If you want to build a mining rig for Monero, you’ve come to the right place. Most mining rigs consist of a frame, basic computer parts (motherboard, power supply, RAM, etc.), and somewhere between 4 and 7 GPUs. You can customize and modify your rig however you want depending on your initial investment and your plans for the future, but we’ll be describing a basic 6 GPU mining rig for Monero in this guide.
This 6 GPU mining rig will cost you around $1,800 to $2,500 depending on the prices you manage to secure for your GPUs. Currently (6/1/2017), most of the best GPU options are sold out, causing ridiculously high prices to pop up on Amazon, eBay, and other merchants. That said, there are ways to acquire GPUs at moderate prices, and I’ll describe that below.
Hardware List for 6 GPU Monero Mining Rig
Power Supply Unt (PSU) – What’s the best PSU for mining Monero? You’re going to want a power supply that can save you as much energy as possible in the long run, since you’ll be trying to offset the price of electricity with the profits you make from mining. If you have a low-quality or inefficient PSU, you’re going to be incurring unnecessary charges on your electricity bill. It’s also a good idea to get a high-quality PSU so that you’re safe from fire or other random problems.
Good 1200 Watt options for your 6 GPU rig (Corsair is generally a good brand):
- Corsair CP-9020140-NA HX1200 1200W 80 Plus Platinum High Performance Power Supply
- Corsair AXi Series, AX1200i, 1200 Watt (1200W), Power Supply, 80+ Platinum Certified
You definitely want a 1200 W PSU if you’re going to have 6 GPUs running at the same time, but if those are generally low in stock and you are willing to settle for 4 or 5 GPUs on your rig, you can go with a 1,000W power supply (but you still should get one that’s rated for low electricity consumption!).
Motherboard — What is the best motherboard for mining Monero? There are lots of doable motherboard + CPU combinations that will work for building an Monero mining rig, but actually finding one in stock can be a bit of a headache. Some sites sell pre-configured motherboard + CPU products, but if you want to save some money, it might be worth your effort to look around on Amazon and eBay to find a good combination that will work for you.
It goes without saying that you’re going to want a motherboard with the same number (or more) PCI slots you’re going to need for your graphics cards. If you are willing to settle for using less than 6 GPUs in your rig (and thereby getting less profit), there are tons of options to choose from and they are widely-in stock. But if you want to stay true to the plan, max out your profits, and run 6 GPUs, you’re going to have to do a bit more digging to find the appropriate combo on some hard-to-find motherboards.
The below are easy links to Amazon, but if you can’t find one on Amazon, it’s also worth checking eBay and Newegg for stock.
The two most popular boards (and therefore the best for getting support online:
Other options that will work just fine:
- ASRock ATX H97 Anniversary Edition Motherboard
- MSI Z97 Intel LGA 1150 Gaming Motherboard
- Asrock B85 Anniversary Motherboard
CPU — Now, what is the best CPU for mining Monero? That’s a much easier question: the simple answer is that you should get a CPU that works with the slot on your motherboard. If you’re going to get one of the above motherboards, chances are you’re going to need an Intel CPU for slot LGA 1150. Unless you plan to use your rig for something other than mining, you should just get a budget Intel Celeron CPU to keep the cost of your rig down.
RAM — What’s the best RAM to buy for mining Monero? To go with your motherboard and your CPU, you’re going to need some RAM for your rig. The most economical purchase is likely to be a single stick of 4GB DDR3 RAM. If you want to run other applications on your rig for one reason or another, then perhaps go with 8GB. Regardless, you don’t need much RAM to mine.
Graphics Cards (GPUs) (4-6x) — What’s the best GPU for mining Monero? There are lots of good answers to this question, but as of the time of this writing, the answer is: whatever cards you can get your hands on. Stock is so limited that almost anything is better than nothing, but there are still a select few AMD RX cards that you should probably stick to.
The actual brand of the card is not the most important part (although some are better than others, like the usually-higher-quality Sapphire and MSI), rather you want to make sure you get the right AMD chip. A variety of manufacturers make cards using AMD RX 470, 480, 570, and 580, and just about any of them will work fine. Also, it’s likely a good idea to get an 8GB RAM card.
- AMD Radeon RX 580 – An RX 580 will likely get you more than 400H/s, and when stock is available, it’s a great card for mining Monero.
- AMD Radeon Rx 480 – Another great card for mining Monero is the Radeon RX 480. This card usually gets more than 400H/s after a bios mod and tweaking the clock speed and uses roughly 150 watts.
- AMD Radeon Rx 470 – Basically the smaller brother of the RX 480, the RX 470 is widely regarded as the best bang for your buck in Monero mining — as long as you can find it. After you mod it, you’ll get more than 400H/s, and it consumes around 140 watts.
- Gigabyte GeForce GTX 1070 – While I would recommend against getting an Nvidia card (they tend to have less support from mining software), it’s impossible not to mention the GTX 1070. It will get you more than 400H/s and uses almost half as much energy as the RX cards, so while it may be expensive up front, it might pay off for some in the long run.
PCIe Riser Cables — What are the best PCIe risers to use for mining? In my experience (and I’ve asked around about this quite a bit to professional miners), you’re best off using the Ver. 06C or Ver. 007 6-pin to SATA PCIe risers that you can find on Amazon and other retailers. Don’t cheap out on these — get some good quality risers. This is one area of your rig that will most likely fail at some point, and if that happens, you don’t want to lose a card or have a wire catch on fire.
1x Solid StateDrive (SSD) — What’s the best hard drive/SSD for mining Monero? You probably want to get a solid state drive of course (it will save you on energy and would be one less failure point for a rig that’s going to be running 24/7). A 120GB SSD will do just fine from just about any brand.
Mining Case — You’re going to need something to keep your rig put together on (you only need one!) If you don’t have the skill or materials to build your own (people have built some crazy cases out of a variety of materials), you probably want to get something that was assembled by someone else. Something like this one on Amazon would work perfectly.
Operating System — You have a few options when it comes to operating system. I personally went with Windows 10 for my rig (most software for mining will work fine with Windows, and I already had a key laying around from an old computer). But if you don’t already have access to Windows 10 for free or cheap, you can try a modern fork of Linux, too!
Accessories — Of course you’re going to need a cheap Monitor, Mouse and Keyboard to get everything set up, but chances are if you’re looking build a rig then you already have some of these laying around somewhere. Also, don’t forget to buy a cheap power button for your rig so that you can easily turn it off and on.
How to Assemble Monero Mining Rig
After you’ve managed to pick up all of these parts, you have to embark on the actual process of building your rig. So how do you assemble a Monero mining rig once you have all the parts? It might seem daunting if you’ve never assembled a computer before, but it’s actually pretty simple. Just follow these steps.
Steps to assemble a Monero Mining Rig
Step 1 — Get your rig case set up. I ordered a wooden “case” from eBay for my rig, so it required a bit of work to put together. This step will depend on where you get your case (or if you decide to build it yourself), so simply follow the instructions from the manufacturer. My wooden “case” just required me to have a philip’s head screwdriver, and to screw in a couple screws. Then I was ready to mount the motherboard.
Step 2 — Mount the motherboard. After your mining case is set up and ready to go, you’ll need to mount your motherboard to the rig so that the bottom of it is protected from damage. My wooden rig included some spacers and screws for this, so it was pretty straightforward. I laid my motherboard on the wooden case to make marks for the holes with a pen, and then placed each spacer above the marks.
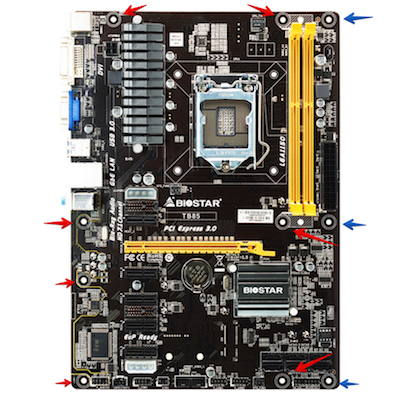
Here’s an example of these holes on the Biostar TB85 motherboard. The red arrows show the holes I would consider mandatory on this board (they were the only ones that fit on my case), and the blue arrows I left unscrewed.
I used the screw and screw driver to get a hole going for each spacer. Then I removed the screws from the wooden case, placed the motherboard on top of the spacers (this part might take a bit of work to line up all the spacers correctly), and then screwed each screw in. You’re going to want to use all of the screws that your motherboard requires, which will probably be somewhere between 7 and 10.
Step 3 — Connect the CPU. This step varies by motherboard and CPU (it’s slightly different for AMD CPUs, compared to Intel CPUs, for example), but it’s still pretty straightforward. You should always check your CPU and Motherboard instructions before proceeding, but the gist is this: open up the CPU holder using the lever, remove the plastic insert (if your motherboard has one), and place the CPU inside. You’re going to want to look for an arrow on one corner of the CPU and line it up with an arrow on the motherboard.
Click here for an easy and quick rundown on how to install a CPU on a motherboard.
Once you have the CPU actually seated and installed properly on the motherboard, you need to connect the CPU fan to the motherboard. You should see a three-pin connector that is likely labeled something like “CPU fan”. Then, you should use an 2×4-pin cable to connect your CPU to the power supply. Most likely the cable (and the GPU) will be labeled CPU. The port that you want to connect to your power cable is going to liekyl be a 4-pin port located somewhere on the motherboard near the CPU.
Step 4 — Install the RAM. You’ll see two or four slots on your motherboard for DDR3 RAM. You already ordered your DDR3 RAM sticks from Amazon (or some other dealer). Simply remove them from the packaging, make sure the levers for holding down the RAM are open, and seat the RAM in the motherboard. If you do it correctly, the stick(s) should click into place nicely on both sides and should be secure.
Step 5 — Connect the SSD. This is a pretty simple step as well. You should have an SSD which will serve as your hard drive. Connect this SSD to the motherboard using the SATA data cable that most likely shipped in the same box as your motherboard. After this, connect your SSD using the sata power cable that came with your GPU. One cable should be labeled SATA, you should connect that end to the GPU end that also says SATA, and then connect the SATA cable to your SSD.
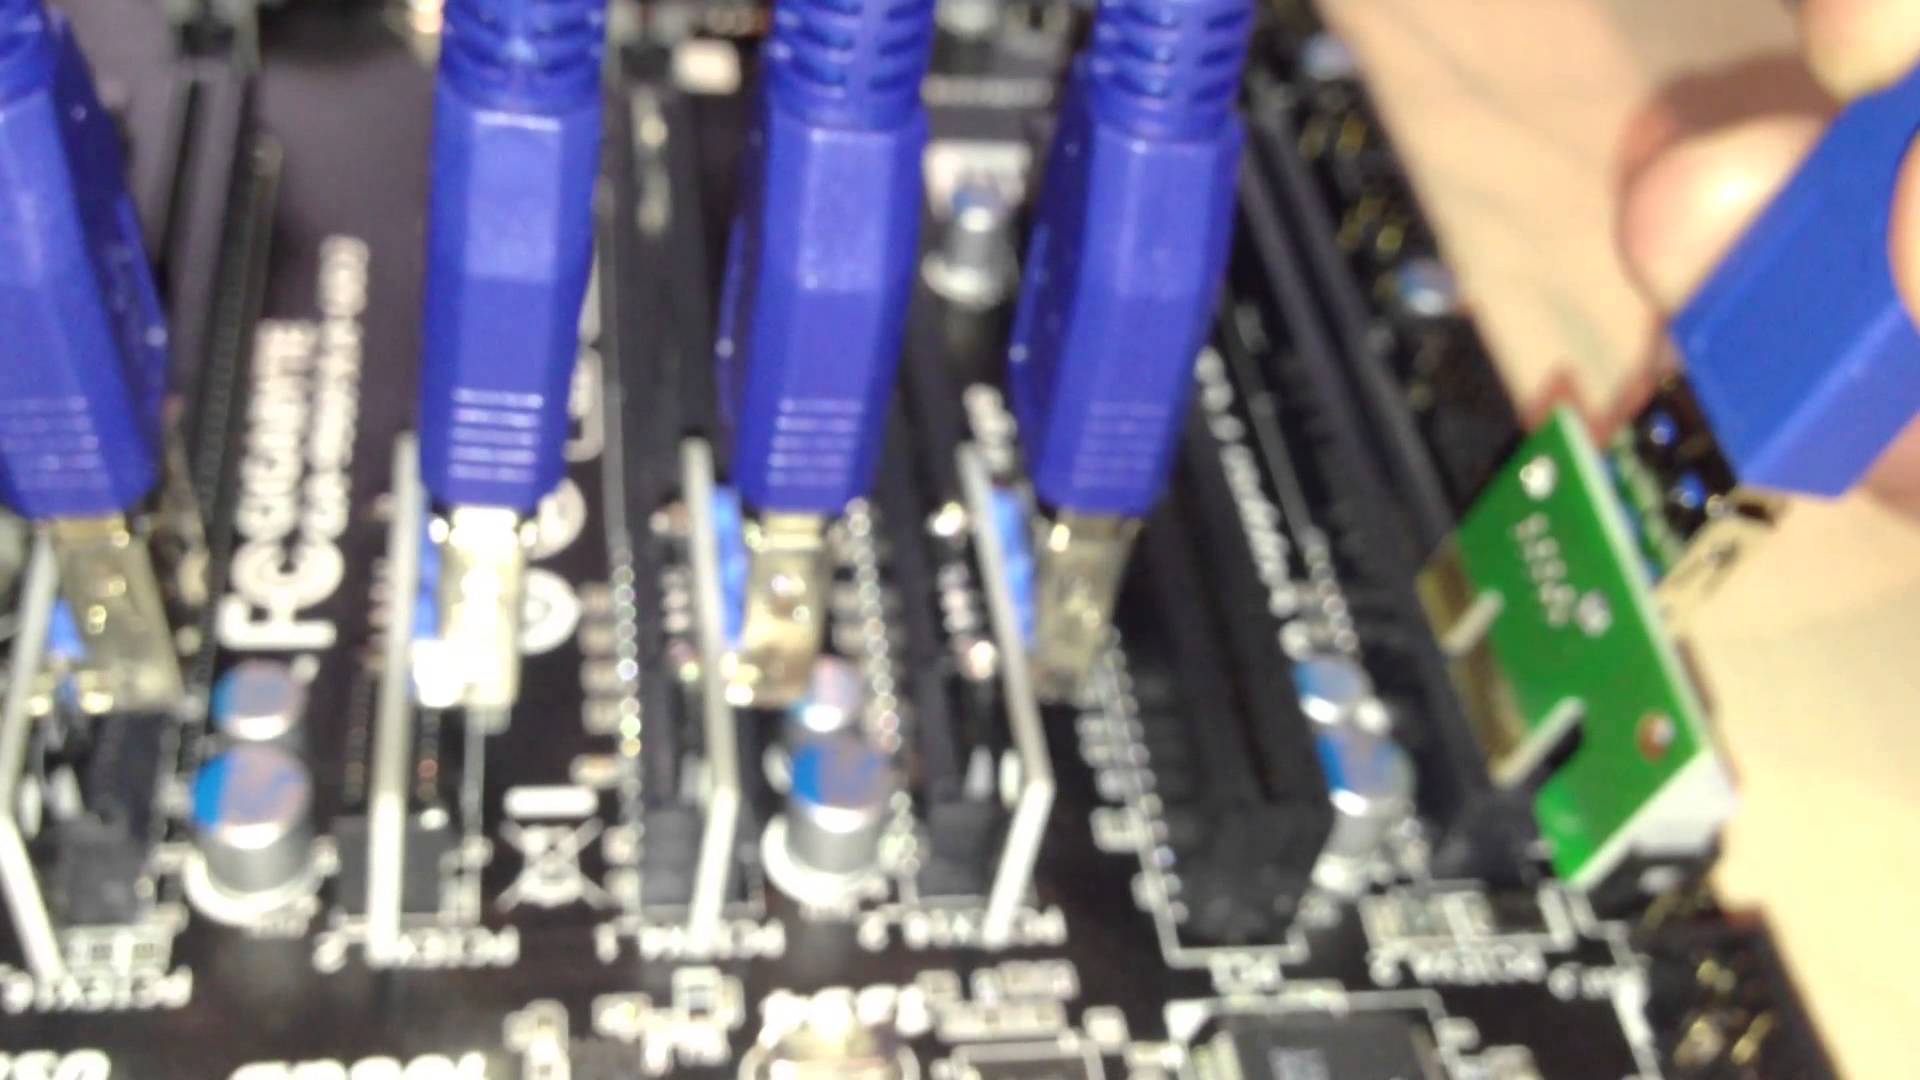
Step 6 — Mount and connect GPUs. This is likely going to be the trickiest part of the actual hardware assembly, but it’s not that bad. First you need to take out all of the risers from their packaging, and assemble them appropriately. The PCIe 16x part will connect directly to the bottom of the video card, which connects to a USB cable, which connects to a PCIe 1x piece that connects to your motherboard. You can connect this 1x slot to the 1x slots on the board, and also the 16x slot. However, for the 16x slot, be careful to place the 1x piece in the correct direction. The below image depicts the correct placement.
After you have the GPUs connected to the motherboard, you need to mount them to the case. This can be done in a variety of ways, but the most common is to simply place the GPUs on the case and connect them more “permanently” using zip ties. Finally, after you have your GPUs mounted, you should run a cable labeled “VGA” rom the power supply unit to the 6- or 8-pin VGA connector on each GPUs, and you should connect a few SATA power cables to each of the powered risers. I recommended the 6-pin to SATA risers above, and I would further recommend that you only connect at most 2 cards per SATA cable from the GPU.
Step 7 — Mount a couple fans. To keep your rig cool, it’s a good idea to mount a couple of fans that blow towards the GPU and help air flow between your cards. There should be a couple of fan connectors on your motherboard, and it’s pretty simple to mount a fan or two with zip ties.
Step 8 — Connect your power button. You’re probably going to have to take a peek at your motherboard manual to do this correctly (it varies a little bit between boards), but you need to connect your power button to the motherboard. Just find which pins correlate with the button (they’re probably at the bottom of the motherboard, on the opposite side from the CPU).
Step 9 — Check all your connections and cable management. Mining rigs are known for being not that stable and prone to weirdness and fire etc, so it’s a really good idea to check all of your connections and make sure that everything is secure. You should have power cables running from the PSU to the SSD, the GPUs, the GPU powered risers, the CPU port on the motherboard, and the motherboard via its big power cable. And once you know for sure all of these are lined up and connected correctly, you can mount your PSU somewhere on the rig.
One little extra tip that might come in handy is that it’s worth it to use zip ties to clean up your cable management a bit. You don’t want any hot fans (like from the PSU, especially) blowing hot air on another connection. Specifically, watch out for those powered riser converter cables. You don’t want one of those sitting on top of the hot-air-blowing PSU fan. You also want to make sure there isn’t any tension of pressure pulling on any of the connections.
Step 10 — Get software up and running. I’m going to save this for another guide entirely, but after you get all this hardware set up and connected, you’re going to need to get your software up and running. If that’s EthOS, then you simply throw that OS on a USB stick, plug that into your rig, power things up, and press whatever key on your keyboard will let you choose your boot drive. It’s F8 on many motherboards. Then select the USB drive that has EthOS waiting to be installed, and follow the instructions. It’s a similar process for Windows 10, but like I said, I’ll leave this for another guide.
Have feedback or thoughts on how we can improve this guide? Leave a comment.